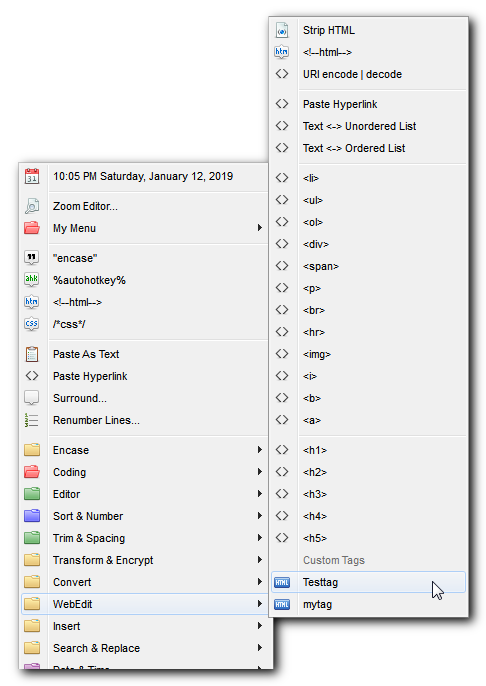
The WebEdit Menu has lots of commands for working with HTML.
The Commands are all listed in the WebEdit category of the Commands listing.
However, notice at the bottom of the WebEdit Menu, where it says Custom Tags.
You can create your own custom html tags and have them show up in this menu.
Since we don't have an Options Panel yet, you can do it by configuring the WebEdit settings in the TextWorx INI file.

Tags can be inserted with pre-made to save you time and hassle.
For example, instead of just surrounding your selected text with just a <p>, you can have it insert this: <p class="xxx">[text-selection]</p> so that you can simply change the value of xxx.
There can be any number of , and you can apply them to whichever tags you like.
If you set the setting, any quotes in the will use either double or single quotes, overriding what is set in the .
This is a toggle-able setting, so you can turn it on and off without changing any of the .
Any tag can be toggled to be self-closing by adding the tag to the list of self-closers.
This means you can change <hr> into <hr/> and <br> into <br/>.
Ordered Lists and Unordered Lists
If you select a bunch of lines of text, you can convert the entire list in to tagged OL and UL entities.
If you enabled the setting, then the <li> lines will all be indented by one tab.
Configure the WebEdit Custom Tags via the INI File
The text before the = is called the INI Key. The text after the = is called the INI Value.
The name in [brackets] is called the INI Section.
Lines that start with a semicolon ; are comments and TextWorx ignores them, but you can use them to make notes.
For this, we will work in the [WebEdit] section of the INI file.
Here is a sample (there are other settings, but they don't have to do with the Custom Tags.
[WebEdit]
maxcustom=5
100=TestTag|test
101=MyTag|mytag
102=e-tag|e
104=Moo|moo
selfclosingtags=<img><hr><br><mytag>
The first key is maxcustom. This is the number of custom entries to be allowed in the menu. In the example below it is set to 5. If you set it to 3, only the first three would show in the menu. It's okay if the value is more than the number of items below it. The key values determine the order of the menu.
The numbers are the INI keys, and they are the internal names of the commands. Their order determines the order the entries appear in the WebEdit Custom Tags Menu.
The INI Value is composed of parameters separated by the | pipe character.
•parameter one = the TITLE - this is the name of the tag that appears in the Menu.
•parameter two = the TAG itself. Textworx will add the < /> itself.
Notice the key for selfclosingtags. These are tags that look like this: <hr/>
If you are an XHTML coder, then you'll want to do this for <hr> and <br>.
If you add your custom tag to that list, it will be self-closing too. You have to add the tag value, not the TITLE, though.
Configure Tag Properties via the INI File
See the description of what a Tag Property is above.
Here is a complete WebEdit INI section:
[WebEdit]
maxcustom=5
100=TestTag|test
101=MyTag|mytag
102=e-tag|e
104=Moo|moo
selfclosingtags=<img><hr><br><mytag>
quotes=single
addtab=1
addprops1=<p><h1><h2>
addprops2=<div>
addprops3=<span>
addprops4=<h3><h4>
addprops5=0
tagprops1=class="xxx"
tagprops2=class=" " id=" "
tagprops3=class="comment"
tagprops4=class="imagebank"
tagprops5=class=""
We already know that maxcustom and the numbered keys (at the top of the section) refer to the Custom Tags.
You can have 5 sets of Tag Properties, and there are two parts to each set.
•addpropsN (where N is 1 through 5) is the list of tags to which you wish to add automatic tag properties.
•tabpropsN (where N is 1 through 5) is the properties to add within the tags. These are the innards of the tag, such as class, url, id, etc.
quotes overrides the quotes to be either double-quotes or single-quotes in the Tag Properties
OL and UL Tabs Setting via INI
addtab This is for the and commands. If it is enabled (value of 1) then TextWorx will add tabs to indent the <li> tags below the <ol> or <ul>. Default is 1. If it is disabled (value of 0) then it will not indent.